
Introduction:
There’s a certain timeless charm to hardwood flooring that can elevate the aesthetics of any space. However, even the most well-maintained hardwood floors can lose their luster over time due to wear and tear. This is where the art of hardwood floor sanding comes into play. With the right tools, techniques, and a bit of elbow grease, you can breathe new life into your hardwood floors, restoring them to their former glory.
Understanding the Process:
Hardwood floor sanding is a meticulous process that involves stripping away the old finish and imperfections from the surface of the wood. This is typically done using a specialized floor sander equipped with abrasive sandpaper. The goal is to remove any scratches, dents, or stains, leaving behind a smooth and uniform surface ready for refinishing.
Preparation is Key:
Before diving into the sanding process, proper preparation is essential. This includes clearing the room of furniture and rugs, as well as ensuring that the floor is free of any debris or obstructions. Additionally, it’s important to inspect the floor for any protruding nails or staples that could damage the sandpaper or the sander itself.
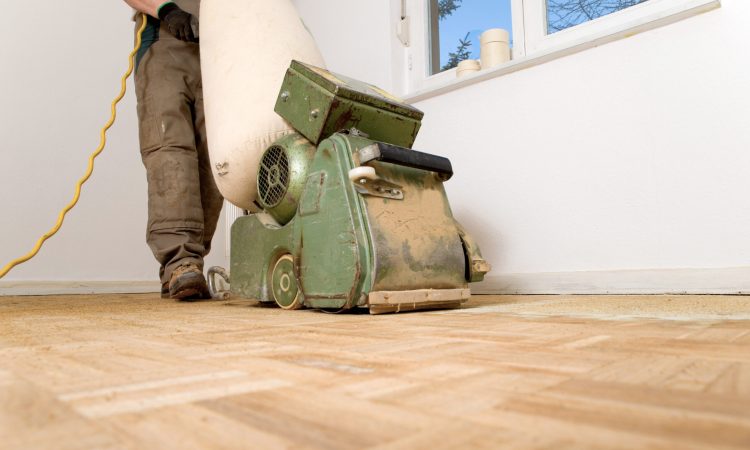
Choosing the Right Equipment:
Selecting the appropriate equipment is crucial for achieving professional-quality results. For most hardwood floor sanding projects, a drum sander is typically used for the main sanding process, while an edger is employed for reaching tight corners and edges. It’s also essential to use the correct grit of sandpaper, starting with a coarse grit to remove the old finish and gradually working your way up to finer grits for a smoother finish.
Techniques for Success:
When sanding hardwood floors, it’s important to work systematically, sanding in the direction of the wood grain to avoid causing any damage or scratches. Start with the drum sander, working from one end of the room to the other in straight, overlapping passes. Once the main sanding is complete, use the edger to tackle any hard-to-reach areas along the walls and in corners.
Dealing with Imperfections:
During the sanding process, it’s not uncommon to encounter imperfections such as deep scratches or gouges in the wood. While some minor imperfections may be able to be sanded out completely, more severe damage may require additional steps such as filling the affected areas with wood filler or performing spot sanding with a handheld sander.
Finishing Touches:
Once the sanding is complete and the floor is smooth and uniform, it’s time to apply the finishing touches. This typically involves vacuuming the entire area to remove any dust or debris, followed by wiping down the floor with a damp cloth to ensure it’s clean and ready for refinishing. From there, you can apply your chosen finish, whether it be a traditional polyurethane sealant for a glossy look or a penetrating oil for a more natural appearance.
Conclusion:
In conclusion, hardwood floor sanding is a transformative process that can breathe new life into your home’s flooring. By following the proper techniques and utilizing the right equipment, you can achieve professional-quality results that will leave your hardwood floors looking beautiful for years to come. So don’t let worn-out floors detract from the beauty of your home – unleash the potential of hardwood floor sanding and rediscover the timeless elegance of hardwood flooring.


